How to Choose Boulders for Stunning Landscape Design
Choosing the right boulders is key in landscape design and boulder landscape architecture. Think about size & scale first, large landscape boulders create a dramatic focal point, while small ones highlight subtle details. Rounded shapes feel natural, angular shapes suit modern designs, and color & texture should match your home for visual cohesion.
Use retaining walls, partially bury boulders, and balance with plants, lighting, and hardscaping for natural integration. Odd numbers like 3, 5, or 7 boulders and rocks feel organic. Explore residential landscaping with boulders, front yard boulder landscaping ideas, small landscaping with boulders photos, large boulder landscaping ideas, and landscaping with boulders on a slope to plan effectively.
Why Boulders Are Important in Landscape Design
Boulders are essential in landscape design because they add natural beauty, texture, and a sense of permanence to any yard. They create striking focal points and complement plants, lighting, and hardscaping for natural integration. Large boulders help with retaining walls, slope erosion control, and defining spaces, while flat stones serve as natural seating or edges for water features.
Using landscaping with boulders photos, whether for residential landscaping with boulders, front yard boulder landscaping ideas, small landscaping with boulders photos, or large boulder landscaping ideas, helps plan placement effectively.
On slopes, landscaping with boulders on a slope improves stability, and combining boulders and rocks supports low-maintenance, sustainable xeriscapes while reducing lawn areas.
Popular Types of Boulders
- Granite Boulders: Strong, durable, weather-resistant; perfect for focal points and retaining walls in any garden.
- Sandstone Boulders: Warm, earthy tones that make your outdoor space feel cozy and natural.
- Limestone Boulders: Light-colored, soft textures; ideal for timeless and classic landscape designs.
Choosing Boulders Based on Size and Shape
- Small boulders (1–2 ft): – Perfect for accents, rock gardens, or filling gaps to add texture and charm.
- Medium boulders (2–4 ft): Great for defining garden spaces, creating flow, or supporting retaining walls.
- Large boulders (5+ ft): Make dramatic focal points or bold statement features that instantly grab attention.
- Rounded boulders: Give a soft, natural, and classic garden feel; great if you want a relaxed vibe.
- Angular/jagged boulders: Add bold, modern, or rugged aesthetics; perfect for structured or contemporary designs.
- Flat boulders: Can serve as informal seating or stepping stones for functionality and style.
- Placement tips: Bury one-third for a natural, unearthed look, group in odd numbers, and nestle with plants for authenticity.
Color Selection for Harmonious Landscaping
- Analogous colors: – Use colors next to each other (blue, purple, green) for a calm, smooth garden flow.
- Complementary colors: – Opposite colors (red/green, purple/yellow) create energy and make features pop.
- Warm colors: – Reds, oranges, yellows bring coziness, cheer, and lively vibes to your landscape.
- Cool colors: – Blues, purples, greens make spaces feel calm, serene, and visually larger.
- Garden color palette: – Start with a main color, add accents, and tie everything with landscaping color combinations.
- Flower garden color schemes: – Include flowers, foliage, and textures for year-round depth and interest.
- Garden color palette hex codes: – Use exact shades for precision, balance, and a harmonious look.
Placement Tips for Aesthetic Appeal
- Create a Focal Point: Use a statement piece, a fireplace, or a large mirror and arrange furniture placement around it.
- Pull Furniture from Walls: Open spaces and form conversational zones for better home aesthetics.
- Balance & Proportion: Match sizes of furniture, decor, and accents; maintain symmetry or intentional asymmetry.
- Use Vertical & Horizontal Lines: Employ tall shelves, curtains, and accent pieces for height and stability.
- Cohesive Color & Texture: Blend home aesthetics types, furniture textures, and color schemes for harmony.
- Negative Space & Flow: Leave empty areas to highlight key accents and maintain smooth movement through rooms.
- Test Placement: Use removable strips to observe interaction before finalizing decor placement.
| Boulders Placement & Design | Plants & Water Integration |
| Natural Placement: Partially bury boulders to mimic natural erosion and create an organic look. | Aquatic Plants: Use lilies, lotus, and pond-friendly plants to enhance water features and improve water quality. |
| Focal Points: Large boulders as centerpieces soften with plants for visual balance. | Ornamental Grasses & Ferns: Soften edges around rocks and create a lush, natural feel. |
| Texture & Color: Combine smooth or textured boulders with contrasting plant foliage for visual interest. | Succulents & Drought-Tolerant Plants: Ideal for rock gardens and dry areas to reduce maintenance. |
| Odd Numbers: Group boulders in 3s or 5s for balanced, natural aesthetics. | Ground Covers & Creepers: Blend rocks into soil and prevent erosion. |
| Terraces & Retaining Walls: Stack boulders for elevation, planting beds, and layered depth. | Edge Planting: Surround ponds, streams, and water cascades with ferns or low shrubs for natural transitions. |
| Pathways & Stepping Stones: Flat boulders create functional and scenic garden routes. | Wildlife Habitat: Create microhabitats for birds, pollinators, and beneficial insects with plants and boulders. |
| Lighting & Mulch: Highlight boulders at night and use soil/mulch to fill gaps for smooth integration. | Water Features: Incorporate boulders along ponds, fountains, and streams to anchor water visually and naturally. |
DIY vs Professional Installation
| Factor | DIY Installation | Professional Installation |
| Cost | Lower initial cost, pay mainly for materials, labor-free. | Higher upfront cost (labor + materials), but avoids costly mistakes. |
| Time & Efficiency | Time-consuming, may take multiple weekends depending on project complexity. | Fast and efficient; experts complete tasks quickly with specialized tools. |
| Skill & Expertise | Requires personal skills, a learning curve, and potential for errors. | Access to professional expertise, certifications, and experience ensures accuracy. |
| Tools & Equipment | Need to purchase or rent the necessary tools. | Professionals bring specialized tools included in the service. |
| Safety & Code Compliance | Risk of safety hazards; may not meet code compliance. | Ensures safety, follows regulations, and preserves warranties. |
| Best For | Simple tasks like painting, basic landscaping, click-together flooring, or self-monitored security systems. | Complex tasks: electrical, HVAC, major plumbing, new windows, structural renovations, or professional security systems. |
| Outcome & Warranty | Sense of accomplishment, but may void product warranties if mistakes occur. | Guaranteed results, warranty/insurance included, professional monitoring for security or long-term reliability. |
Maintenance and Longevity of Boulders
- Low Maintenance: Boulders require minimal upkeep compared to plants or mulch; occasional rinsing, weeding, and clearing debris keeps them clean.
- Durability & Longevity: Properly installed boulder walls or landscape rocks can last decades, often 50 to 200 years, resisting weather, erosion, and decomposition.
- Installation & Drainage: Correct soil compaction and ensuring proper drainage (weep holes, gravel trenches) are crucial for stability and long-term performance.
- Weed & Vegetation Control: Regularly prune nearby plants, manage roots, and pull weeds or moss to prevent displacement or root damage.
- Cleaning & Appearance: Hosing down or mild washing removes dirt and stains; avoid abrasive brushes on sensitive stones like sandstone or limestone.
- Inspection & Repairs: Periodically check for loose stones, cracks, or shifting, and repair with mortar or adhesive when necessary.
- Enhancements: Apply stone sealers for porous rocks to preserve color and protect against moisture, and refresh ground cover to maintain a vibrant landscape.
Creative Ideas Using Boulders in Your Landscape
Boulders enhance landscapes by adding natural texture, structure, and focal points. They can form retaining walls, terraces, steps, and pathways, provide patio seating, and define edging and borders for flower beds or driveways. Boulders work beautifully in rock gardens, Zen gardens, or around ponds and waterfalls, often paired with flowers, climbing vines, or landscape lighting. Arranging them in clusters, partially burying them, or mixing large boulders with small cobbles creates a natural look. They also serve as focal points, raised planters, or decorative house numbers, offering year-round beauty, low maintenance, and versatile design possibilities.
Analyzing Soil and Terrain Before Choosing Boulders
Choosing the right boulders starts with carefully analyzing soil, terrain, and drainage to ensure a stable and lasting landscape.
Consider slopes for erosion control, soil bearing capacity for retaining walls, and match boulder type like granite or sandstone to your climate and design, including lichen or moss effects. Test placement with boxes or bags, partially embed boulders, and use mounds for a natural, cohesive look.
Boulders for Erosion Control and Stability
- Riprap: Place large, heavy boulders on slopes or riverbanks to absorb water force and prevent soil displacement.
- Dry-Stacked Boulder Walls: Mortarless walls using interlocking boulders for drainage, flexibility, and natural aesthetics.
- Terracing: Position boulders to create steps that slow runoff and stabilize hillsides.
- Soil Anchoring: Embed boulders partially into slopes (1/3 to 1/2 height) for structural stability.
- Drainage Management: Gaps between boulders allow water to filter, preventing hydrostatic pressure and landslides.
- Energy Dissipation: Boulders reduce water impact, protecting soil from erosion.
- Material Choice: Use durable granite or limestone suited for long-term erosion control.
- Vegetation Integration: Combine boulders with plants to further stabilize slopes and enhance natural landscape aesthetics.
- Size Consideration: Larger boulders for steep slopes, smaller ones for gentler areas, for optimal stability.
Seasonal Considerations in Boulder Selection
- Spring (April-May): Ideal for planning boulder landscaping, but watch for muddy conditions due to snowmelt; good for assessing soil stability and drainage.
- Summer (June-August): Warm, dry conditions suit the installation of boulders; avoid peak heat to prevent staining and material stress.
- Fall (September-October): Best time for boulder placement with stable temperatures, low humidity, and preparation before winter; great for refreshing rock walls and decorative boulders.
- Winter (November-March): Cold, snowy conditions can affect stability; professional installation may be required; good for observing landscape structure rather than adding new boulders.
- Outdoor Recreation (Bouldering): Cooler, dry conditions in fall, winter, and early spring provide optimal grip; spring may bring muddy, slippery trails.
- Material & Aesthetic Considerations: Choose boulders that complement seasonal foliage, lichen/moss growth, and withstand freeze-thaw cycles.
- Site Prep: Ensure proper drainage, soil compaction, and a stable base to prevent shifting or heaving across seasons.
Matching Boulders with Hardscape Elements
- Complement Colors & Styles: Choose boulders that match your home and existing hardscape.
- Contrast Textures: Pair rugged boulders with smooth pavers, gravel, or flagstone.
- Vary Sizes & Shapes: Use odd-number groupings and partially bury boulders for a natural look.
- Define Spaces: Integrate boulders with walkways, patios, retaining walls, or water features.
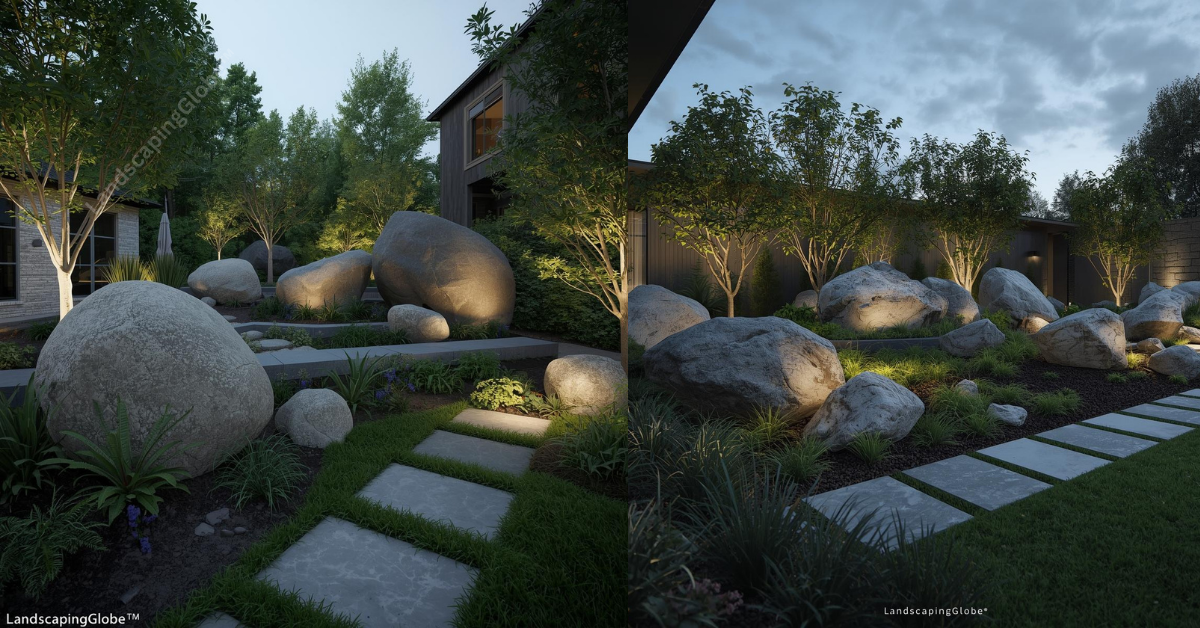
Lighting and Shadow Effects Around Boulders
- Grazing: Place a light close to the boulder surface to emphasize textures and crevices, creating dramatic shadows.
- Uplighting/Highlighting: Shine lights from the base of boulders to make them appear monumental and sculptural.
- Shadowing (Silhouette): Position lights behind boulders and plants (ferns, grasses) to cast intriguing shadows.
- Pathway & Cross-Lighting: Use path lights, in-grade LEDs, or multiple angles to enhance edges and balance light and shadow.
- LEDs & Warm White: Use energy-efficient LEDs with warm tones for natural ambiance; layering techniques increase depth.
Conclusion
Proper lighting and shadow techniques transform boulders into dynamic focal points, enhancing texture, depth, and ambiance in your landscape. Using methods like grazing, uplighting, moonlighting, and shadowing, along with LEDs, pathway lights, and strategic angles, ensures your outdoor space looks stunning day and night while highlighting natural beauty and integrating with surrounding plants and hardscape elements.
FAQS
Q1: What is the rule of 3 in landscaping?
The rule of 3 suggests grouping plants, rocks, or boulders in odd numbers (3, 5, 7) to create a natural, balanced, and visually appealing arrangement. Odd numbers prevent symmetry that can look artificial, helping landscapes feel organic.
Q2: What are common rock design mistakes to avoid?
Common mistakes include using rocks that are too small or uniform, ignoring scale and proportion, overcrowding the area, failing to consider drainage, and not embedding boulders properly. These errors can make a design look cluttered or unstable.
Q3: How to arrange boulders in a landscape?
Arrange boulders in groups of varying sizes, partially bury them (about 1/3 of their height), and place them with natural spacing. Incorporate paths, plants, or lighting to highlight features, ensuring both function and aesthetics.
Q4: What rock looks best for landscaping?
The best rock depends on climate, soil, and design goals. Common choices include granite, limestone, sandstone, and fieldstone, selected for durability, color, texture, and how well they blend with surrounding plants and hardscape elements.